Originally by Rory Mangles
First you'll need to get the VESC tool from here:https://www.vesc-project.com/vesc_tool
Once installed, connect the VESC to the motor, receiver, and batteries you want to use, and make sure the lights on the VESC are on, then connect the VESC to the computer via a USB cable. Once the VESC Tool is open, click the Connect button (Circled in red). First time you use it it will likely ask for a firmware upgrade, if not you can skip the next step.

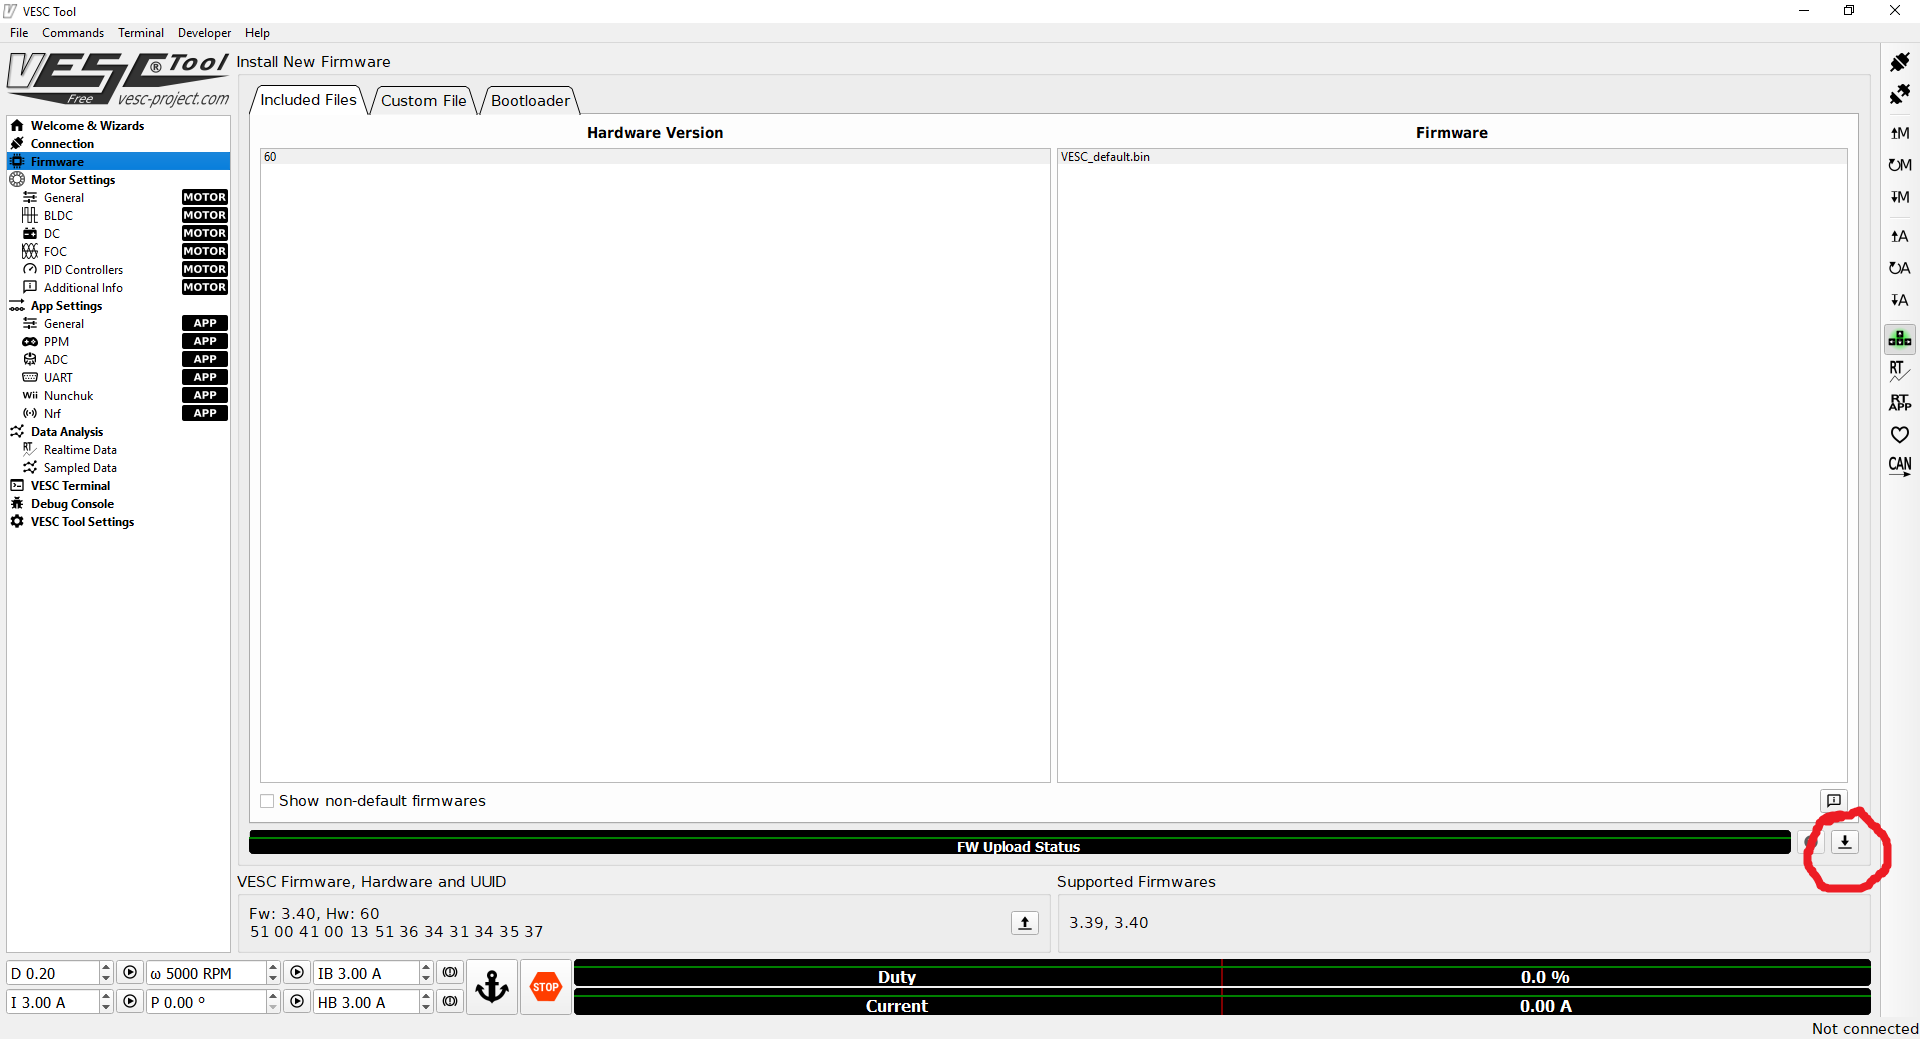
Often a message will appear stating the VESC has old firmware. To fix this click the 'Firmware' tab in the top left, and then click the download button circled in red. The VESC Tool will already have selected the correct firmware for your device so there's no need to select any manually.
The VESC Tool will then take a few seconds to upload the latest firmware to your VESC. The VESC will then disconnect and flash a warning not to power it off while the VESC is installing the new firmware. After 10 seconds or so, go back to the front page and hit 'AutoConnect' again. This time it should say the latest firmware is installed.
Once the VESC is connected and the latest firmware version is uploaded, hit the 'Setup Motors FOC' button on the front page. This wizard will take you through the motor setup procedure step by step.

First step is to select the approximate motor size. Its better to undersize here than over size if you're not sure, as this is less likely to damage things, but its not super critical to get exactly right. For example 6374 sized motors are medium outrunners. For inrunners, scroll down. Hit next once the correct size is selected

Next step is to select number of battery cells. This sets up the low voltage cut off, so don't set it too high. You can leave it at the default of 3 cells if you want to effectively disable the low voltage cutoff.

It then asks you to set up gear ratios and pulley diameters. This is of no use unless you are planning on using telemetry as it’s just to give your wheel speed, so usually can be ignored. At this point press 'Run Detection (no CAN)' (or 'Run Detection', it makes a minimal difference if you have no CAN bus set up).
It will give you a warning saying it’s going to spin the motor. Once you accept it will make some alarming noises and the motor will move around a bunch.

If all goes well a box will pop up informing you that it was successful and provide a load of motor parameters. If you're running sensors be sure to detect that they were detected correctly (This test was done with a sensorless motor). If they didn't detect, double-check your sensors are connected and functioning correctly. Hit Ok once you are ready.

You are then given the option to test which way the motor is spinning and invert the direction if needed. This is also good chance to test that the motor spins as expected. Pressing either Fwd or Rev will spin the motor slowly in either direction. Hit 'Finish' once you are done.

Press the 'Input Setup Wizard' on the main page and select load default config. Once thats done, the list above will appear. Assuming this is a 2wd robot with one motor a side, select 'Single VESC'. For 4wd or 2 motors per wheel, you can either use CAN bus, which is configured using the other two buttons, or you can set each VESC up seperately and just use the same servo output from the RX with a Y lead.

Select PPM input for Servo signals

Turn on your transmitter and make sure the RX is connected. Select Duty Cycle mode, click refresh in the bottom right, then move the stick up and down fully. The bars on the bottom right should move with the stick. Once you've done that, let the stick rest in the center, and click Apply


PPM Configuration is where you set up how the VESC responds to inputs. For most robot applications you want to use “Duty Cycle” mode, which controls the motor speed with stick position. Next, you want to set 'Median Filter' and 'Safe Start' to 'False'. This allows the VESC to recover immediately after a fault without having to center the sticks. This is vital as a VESC will often flag an error after a current spike from a big spinner hit or similar, so turning these off means it immediately recovers automatically. You also have the option to adjust the ramping time, which is how fast it responds to your stick inputs. Generally, you don't want these to be zero as the controller may lose track of the motor while trying to keep up with the stick movements. 0.2 seconds generally works well for the drive, but larger values can be used for weapons to ensure a reliable spin-up.
Once these are set, hit 'Write Configuration to VESC' and then 'Next' and you are done! The motor should now spin when you move the stick.

In most cases the default setup will be fine and no other settings need changing, but there are a few points worth knowing in case issues crop up. The motor current (which sets the max torque) will be set automatically by the detected parameters and is generally pretty accurate as to the max current the motor can happily handle. You can turn it up a bit but usually this leads to the motor overheating. The 'Absolute Maximum Current' setting is the current at which the controller will flag an error. DON'T TURN THIS DOWN unless you want your robot cutting out all the time.
The -ve motor and battery currents set your regen. Especially with weaponry, its best to turn the -battery current down to around -10A to stop it from charging the batteries to quick and damaging them. Don't set it too low as this can cause a bug where the motor doesn't stop spinning.
After any changes hit the 'Write Motor Config' button (M with a down arrow in the top right) in order to write the changes to the VESC.
Big Dill Drive Setting: Bold is what you need to change
Motor Max: 60a
Motor Brake: -30a
Abs Max: 150a
ABS Limit: True
Max/Min Scale: 100%
Battery Max: 99a
Battery Regen: -40a
OC Mode: Current Limit
OC Adjusment: 16
A common issue is a motor cutting out after quickly throttling up. This is due to the current ramping too quickly and going over the Absolute Max Current limit. To fix this KP and KI can be adjusted. The settings for this are found under the FOC tab, though these apply whether using FOC or BLDC mode. Try increasing KP and KI by 10x, write the motor config and try again. If this improves things keep adjusting around until the motor gets up to full speed consistently without cutting out. There's probably a more scientific method to this, but trial and error is the easiest and has a low risk of damaging things.